Logstash Pipelines
After bringing up the ELK stack, the next step is feeding data (logs/metrics) into the setup.
Based on our previous introduction, it is known that Logstash act as the bridge/forwarder to consolidate data from sources and forward it to the Elasticsearch cluster. But how?
ELK Data Flow
The data flow in ELK is as below:
- Something happens on the monitored targets/sources:
- A path down happens on a Linux OS
- A port flap happens on a switch
- A LUN is deleted on a storage array
- A new event is triggered on an application
- Etc.
- The event/metric/activity gets recorded by:
- syslog
- filebeat
- metricbeat
- Etc.
- Based on the configuration of syslog/filebeat/metricbeat/etc., event(s) are forwarded to Logstash (or to Elasticsearch directly, but we prefer using Logstash in the middle);
- Logstash:
- Get data through its licensing port(s);
- Filter/Consolidate/Modify/Enhance data;
- Forward data to the Elasticsearch cluster or other supported destinations;
- Elasticsearch store and index data;
- Kibana visualize data.
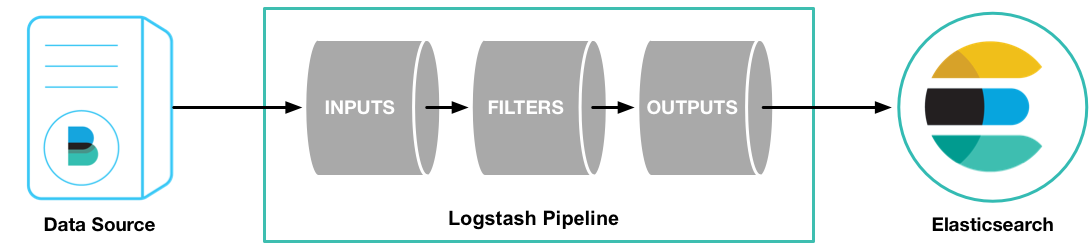
Logstash Pipeline
Based on the “ELK Data Flow”, we can see Logstash sits at the middle of the data process and is responsible for data gathering (input), filtering/aggregating/etc. (filter), and forwarding (output). The process of event processing (input -> filter -> output) works as a pipe, hence is called pipeline.
Pipeline is the core of Logstash and is the most important concept we need to understand during the use of ELK stack. Each component of a pipeline (input/filter/output) actually is implemented by using plugins. The most frequently used plugins are as below:
- Input :
- file : reads from a file directly, working like “tail -f” on Unix like OS;
- syslog : listens on defined ports (514 by default) for syslog message and parses based on syslog RFC3164 definition;
- beats : processes events sent by beats, including filebeat, metricbeat, etc.
- Filter :
- grok : parses and structures arbitrary text;
- mutate : modifies event fields, such as rename/remove/replace/modify;
- drop : discards a event;
- Output :
- elasticsearch : sends event data to Elasticsearch cluster;
- file : writes event data to a file;
- graphite : sends event data to graphite for graphing and metrics.
Notes :
- Multiple pipelines can be defined;
- Multiple input sources, filters, and output targets can be defined within the same pipeline;
For more information, please refer to Logstash Processing Pipeline.
Logstash Configuration
We only ontroduced the instalaltion of Logstash in previous chapters without saying any word on its configuration, since it is the most complicated topic in ELK stack. Loosely speaking, Logstash provides two types of configuration:
- settings : control the behavior of how Logstash executes;
- pipelines : define the flows how data get processed.
If Logstash is installed with a pacakge manager, such as rpm, its configuration files will be as below:
- /etc/logstash/logstash.yml : the default setting file;
- /etc/logstash/pipelines.yml : the default pipeline config file.
logstash.yml
There are few options need to be set (other options can use the default values):
- node.name : specify a node name for the Logstash instance;
- config.reload.automatic : whether Logstash detects config changes and reload them automatically.
It is recommended to set config.reload.automatic as true since this will make it handy during pipeline tunings.
pipelines.yml
The default pipeline config file. It consists of a list of pipeline reference, each with:
- pipeline.id : a meaningful pipeline name specified by the end users;
- path.config : the detailed pipeline configuration file, refer to Pipeline Configuration.
Below is a simple example, which defines 4 x pipelines:
- pipeline.id: syslog.unity
  path.config: "/etc/logstash/conf.d/syslog_unity.conf"
- pipeline.id: syslog.xio
  path.config: "/etc/logstash/conf.d/syslog_xio.conf"
- pipeline.id: syslog.vsphere
  path.config: "/etc/logstash/conf.d/syslog_vsphere.conf"
- pipeline.id: beats
  path.config: "/etc/logstash/conf.d/beats.conf"
This config file only specifies pipelines to use, but not define/configure pipelines. We will cover the details with Pipeline Configuration.
Service Startup Script
After Logstash installation (say it is installed through a package manager), a service startup script won’t be created by default. In other words, it is not possible to control Logstash as a service with systemctl. The reason behind is that Logstash gives end users the ability to further tune how Logstash will act before making it as a serive.
The options can be tuned are defined in /etc/logstash/startup.options. Most of times, there is no need to tune it, hence we can install the service startup script directly as below:
/usr/share/logstash/bin/system-install
After running the script, a service startup script will be installed as /etc/systemd/system/logstash.service. Now, one can control Logstash service with systemctl as other services.
Pipeline Configuration
It is time to introduce how to configure a pipeline, which is the core of Logstash usage. It is really abstractive to understand pipelines without an example, so our introduction will use examples from now on.
Pipeline Skeleton
Pipeline shares the same configuration skeleton (3 x sections: input, filter and output) as below:
# This is a comment. You should use comments to describe
# parts of your configuration.
input {
  ...
}

filter {
  ...
}

output {
  ...
}
The details of each section are defined through the usage of different plugins. Here are some examples:
Define a file as the input source:
input {
  file {
    path => "/var/log/apache/access.log"
  }
}
Multiple input soures can be specified:
input {
  file {
    path => "/var/log/messages"
  }

  file {
    path => "/var/log/apache/access.log"
  }
}
Additional fields can be added as part of the data comming from the sources (these fields can be used for search once forwarded to destinations):
input {
  file {
    path => "/var/log/messages"
    type => "syslog"
    tags => ["file", "local_syslog"]
  }

  file {
    path => "/var/log/apache/access.log"
    type => "apache"
    tags => ["file", "local_apache"]
  }
}
Different kinds of plugins can be used for each section:
input {
  file {
    path => "/var/log/messages"
    type => "syslog"
    tags => ["file", "local_syslog"]
  }

  file {
    path => "/var/log/apache/access.log"
    type => "apache"
    tags => ["file", "local_apache"]
  }

  beats {
    type => "beats"
    port => 5044
    type => "beats"
    tags => ["beats", "filebeat"]
  }

  tcp {
    port => 5000
    type => "syslog"
    tags => ["syslog", "tcp"]
  }

  udp {
    port => 5000
    type => "syslog"
    tags => ["syslog", "udp"]
  }
}
An empty filter can be defined, which means no data modification will be made:
filter {}
Grok is the most powerful filter plugin, especially for logs:
# Assume the log format of http.log is as below:
# 55.3.244.1 GET /index.html 15824 0.043
#
# The grok filter will match the log record with a pattern as below:
# %{IP:client} %{WORD:method} %{URIPATHPARAM:request} %{NUMBER:bytes} %{NUMBER:duration}
#
# After processing, the log will be parsed into a well formated JSON document with below fields:
# client  : the client IP
# method  : the request method
# request : the request URL
# bytes   : the size of request
# duration: the time cost for the request
# message : the original raw message
input {
  file {
    path => "/var/log/http.log"
  }
}
filter {
  grok {
    match => { "message" => "%{IP:client} %{WORD:method} %{URIPATHPARAM:request} %{NUMBER:bytes} %{NUMBER:duration}" }
  }
}
Multiple plugins can be used within the filter section, and they will process data with the order as they are defined:
filter {
    grok {
        match => { "message" => "%{COMBINEDAPACHELOG}"}
    }

    geoip {
        source => "clientip"
    }
}
Conditions are supported while define filters:
filter {
  if [type] == "syslog" {
    grok {
      match => { "message" => "%{SYSLOGTIMESTAMP:syslog_timestamp} %{DATA:syslog_hostname} %{DATA:syslog_program}(?:\[%{POSINT:syslog_pid}\])?: %{GREEDYDATA:syslog_message}" }
    }
    date {
       match => [ "timestamp", "MMM dd HH:mm:ss", "MMM  d HH:mm:ss" ]
    }
  }
}
Multiple output destinations can be defined too:
output {
  elasticsearch { hosts => ["localhost:9200"] }
  stdout { codec => rubydebug }
}
By reading above examples, you should be ready to configure your own pipelines. We will introduce the filter plugin grok in more details since we need to use it frequently.o
Output Index for Elasticsearch
If the output plugin is “elasticsearch”, the target Elastcisearch index should be specified. To smooth user expereince, Logstash provides default values. For example, logstash-%{+YYYY.MM.dd} will be used as the default target Elasticsearch index. However, we may need to change the default values sometimes, and the default won’t work if the input is filebeat (due to mapping).
Below is several examples how we change the index:
Customize indices based on input source difference:
output {
  if "vsphere" in [tags] {
    elasticsearch {
      hosts => ["http://e2e-l4-0680-240:9200", "http://e2e-l4-0680-241:9200", "http://e2e-l4-0680-242:9200"]
      index => "logstash-vsphere-%{+YYYY.MM.dd}"
    }
  }

  if "san" in [tags] {
    elasticsearch {
      hosts => ["http://e2e-l4-0680-240:9200", "http://e2e-l4-0680-241:9200", "http://e2e-l4-0680-242:9200"]
      index => "logstash-san-%{+YYYY.MM.dd}"
    }
  }
}
Specify index name for beats:
output {
  elasticsearch {
    hosts => ["http://e2e-l4-0680-240:9200", "http://e2e-l4-0680-241:9200", "http://e2e-l4-0680-242:9200"]
    index => "%{[@metadata][beat]}-%{[@metadata][version]}-%{+YYYY.MM.dd}"
  }
}
The Grok Filter Plugin
Predefined Patterns
Grok defines quite a few patterns for usage directly. They are actually just regular expressions. The definitions of them can be checked here.
Grok Fundamental
The most basic and most important concept in Grok is its syntax:
%{SYNTAX:SEMANTIC}
- SYNTAX : the name of the pattern that will match your text;
- SEMANTIC : the identifier you give to the piece of text being matched.
Let’s explain it with an example:
Assume we have a log record as below:
Dec 23 14:30:01 louis CRON[619]: (www-data) CMD (php /usr/share/cacti/site/poller.php >/dev/null 2>/var/log/cacti/poller-error.log)
By deault, the whole string will be forwarded to destinations (such as Elasticsearch) without any change. In other words, it will be seen by the end user as a JSON document with only one filed “message” which holds the raw string. This is not easy for end users to do search and classify.
To make the unstructured log record as a meaningful JSON document, below grok pattern can be leveraged to parse it:
%{SYSLOGTIMESTAMP:syslog_timestamp} %{SYSLOGHOST:syslog_hostname} %{DATA:syslog_program}(?:\[%{POSINT:syslog_pid}\])?: %{GREEDYDATA:syslog_message}SYSLOGTIMESTAMP, SYSLOGHOST, DATA, POSINT and GREEDYDATA are all predefined patterns
syslog_timestamp, syslog_hostname, syslog_program, syslog_pid and syslog_message are fields names added based on the pattern matching
After parsing, the log record becomes a JSON document as below:
{
                 "message" => "Dec 23 14:30:01 louis CRON[619]: (www-data) CMD (php /usr/share/cacti/site/poller.php >/dev/null 2>/var/log/cacti/poller-error.log)",
              "@timestamp" => "2013-12-23T22:30:01.000Z",
                "@version" => "1",
                    "type" => "syslog",
                    "host" => "0:0:0:0:0:0:0:1:52617",
        "syslog_timestamp" => "Dec 23 14:30:01",
         "syslog_hostname" => "louis",
          "syslog_program" => "CRON",
              "syslog_pid" => "619",
          "syslog_message" => "(www-data) CMD (php /usr/share/cacti/site/poller.php >/dev/null 2>/var/log/cacti/poller-error.log)",
             "received_at" => "2013-12-23 22:49:22 UTC",
           "received_from" => "0:0:0:0:0:0:0:1:52617",
    "syslog_severity_code" => 5,
    "syslog_facility_code" => 1,
         "syslog_facility" => "user-level",
         "syslog_severity" => "notice"
}
The full pipeline configuration for this example is as below:
input {
  tcp {
    port => 5000
    type => syslog
  }
  udp {
    port => 5000
    type => syslog
  }
}

filter {
  if [type] == "syslog" {
    grok {
      match => { "message" => "%{SYSLOGTIMESTAMP:syslog_timestamp} %{SYSLOGHOST:syslog_hostname} %{DATA:syslog_program}(?:\[%{POSINT:syslog_pid}\])?: %{GREEDYDATA:syslog_message}" }
      add_field => [ "received_at", "%{@timestamp}" ]
      add_field => [ "received_from", "%{host}" ]
    }
    date {
      match => [ "syslog_timestamp", "MMM  d HH:mm:ss", "MMM dd HH:mm:ss" ]
    }
  }
}

output {
  elasticsearch { hosts => ["localhost:9200"] }
  stdout { codec => rubydebug }
}
The example is from the official document, please go through it for more details.
Single Pipeline vs. Multiple Pipelines
Based on the previous introduction, we know multiple plugins can be used for each pipeline section (input/filter/output). In other words, there are always two methods to achieve the same data processing goal:
- Define a single pipeline containing all configurations:
- Define multiple input sources
- Define multiple filters for all input sources and make decision based on conditions
- Define multiple output destinations and make decision based on conditions
- Define multiple pipelines with each:
- Define a single input source
- Define filters
- Define a single output destination
Here is the example for these different implementations:
Define a single pipeline:
input {
  beats {
    port => 5044
    type => "beats"
  }
  tcp {
    port => 5000
    type => "syslog"
  }
  udp {
    port => 5000
    type => "syslog"
  }
  stdin {
    type => "stdin"
  }
}

filter {
  if [type] == "syslog" {
    grok {
      match => { "message" => "%{SYSLOGTIMESTAMP:syslog_timestamp} %{DATA:syslog_hostname} %{DATA:syslog_program}(?:\[%{POSINT:syslog_pid}\])?: %{GREEDYDATA:syslog_message}" }
    }
    date {
       match => [ "timestamp", "MMM dd HH:mm:ss", "MMM  d HH:mm:ss" ]
    }
  } else if [type] == "beats" {
    json {
      add_tag => ["beats"]
    }
  } else {
    prune {
      add_tag => ["stdin"]
    }
  }
}

output {
  if [type] == "syslog" or [type] == "beats" {
    elasticsearch {
      hosts => ["http://e2e-l4-0680-240:9200", "http://e2e-l4-0680-241:9200", "http://e2e-l4-0680-242:9200"]
    }
  } else {
      stdout { codec => json }
  }
}
Here is the example implementing the same goal with multiple pipelines:
Define a pipeline configuration for beats:
input {
  beats {
    port => 5044
    type => "beats"
  }
}

filter {
  json {
    add_tag => ["beats"]
  }
}

output {
  elasticsearch {
    hosts => ["http://e2e-l4-0680-240:9200", "http://e2e-l4-0680-241:9200", "http://e2e-l4-0680-242:9200"]
  }
}
Define a pipeline configuration for syslog:
input {
  tcp {
    port => 5000
    type => "syslog"
  }
  udp {
    port => 5000
    type => "syslog"
  }
}

filter {
  grok {
    match => { "message" => "%{SYSLOGTIMESTAMP:syslog_timestamp} %{DATA:syslog_hostname} %{DATA:syslog_program}(?:\[%{POSINT:syslog_pid}\])?: %{GREEDYDATA:syslog_message}" }
  }
  date {
     match => [ "timestamp", "MMM dd HH:mm:ss", "MMM  d HH:mm:ss" ]
  }
}

output {
  elasticsearch {
    hosts => ["http://e2e-l4-0680-240:9200", "http://e2e-l4-0680-241:9200", "http://e2e-l4-0680-242:9200"]
  }
}
Define a pipeline configuration for stdin:
input {
  stdin {
    type => "stdin"
  }
}

filter {
  prune {
    add_tag => ["stdin"]
  }
}

output {
  stdout { codec => json }
}
Enable all pipelines in pipelines.yml
- pipeline.id: beats
  path.config: "/etc/logstash/conf.d/beats.conf"
- pipeline.id: syslog
  path.config: "/etc/logstash/conf.d/syslog.conf"
- pipeline.id: stdin
  path.config: "/etc/logstash/conf.d/stdin.conf"
The same goal can be achived with both methods, but which method should be used? The answer is multiple pipelines should always be used whenever possible:
- Maintaining everything in a single pipeline leads to conditional hell - lots of conditions need to be declared which cause complication and potential errors;
- When multiple output destinations are defined in the same pipeline, congestion may be triggered.
Configuration Pitfall
Based on previous introduction, it is known the file pipelines.yml is where pipelines are controlled(enable/disable). However, there exists a pitfall. Logstash supoorts defining and enabling multiple pipelines as below:
- pipeline.id: syslog.unity
  path.config: "/etc/logstash/conf.d/syslog_unity.conf"
- pipeline.id: syslog.xio
  path.config: "/etc/logstash/conf.d/syslog_xio.conf"
...
However, with the default main pipeline as below, all configurations also seems to work:
- pipeline.id: main
  path.config: "/etc/logstash/conf.d/*.conf"
This is the pitfall:
- By using a single main pipeline to enable all pipeline configurations(*.conf), acutally only one pipeline is working. All configurations are merged together. In other words, it is the same as you define a single pipeline configuration file containing all logics - all power of multiple pipelines are silenced;
- Some input/output plugin may not work with such configuration, e.g. Kafka. When Kafka is used in the middle of event sources and logstash, Kafka input/output plugin needs to be seperated into different pipelines, otherwise, events will be merged into one Kafka topic or Elasticsearch index.
Conclusion
After reading this chapter carefully, one is expected to get enough skills to implement pipelines for production setup. We will provide a full example for a production setup end to end in next chapter.